30-Second Summary
A short butterfly spread is the exact inverse of the long butterfly. It sells the two outer wing strikes and buys the ATM body, collecting a net credit. Max profit equals the credit — achieved any time SPX ends outside either wing at expiration. Max loss occurs at the ATM pin: the worst outcome for the short butterfly is precisely the best outcome for the long butterfly.
The short butterfly is one of the most counterintuitive strategies at this level: it collects a credit but behaves like a long volatility trade. It needs SPX to move, not stay still. Its Greeks are unusual for a credit strategy — positive gamma and positive vega mean large moves and IV expansion help the position. Theta is negative near the body, working against it when SPX is calm.
| Structure | Sell 1 lower call + Buy 2 ATM calls + Sell 1 upper call |
| Cost | Net credit |
| Max profit | Net credit (SPX outside either wing) |
| Max loss | Wing width − credit (SPX pins at ATM) |
| Breakevens | Lower wing + credit pts / Upper wing − credit pts |
| Theta | Negative near ATM — time passing near the body costs you |
| Vega | Positive — IV expansion helps; enter in high-IV environments |
| Best for | Volatile markets; pre-breakout setups; high-IV entry with expected move |
What Is a Short Butterfly Spread?
A short butterfly spread is the mirror image of the long butterfly. Where the long butterfly hopes for a pin, the short butterfly hopes for anything but a pin:
- Lower wing (sell): 1 call below the current price
- Body (buy): 2 calls at the ATM price
- Upper wing (sell): 1 call above the current price
All three strikes are equidistant. The two bought ATM calls are partially funded by the two sold wing calls, producing a net credit. The position profits when SPX ends anywhere outside the profit zone of the long butterfly — below the lower wing or above the upper wing.
The structure decomposes into two sub-spreads:
- A short bull call spread (sell lower / buy ATM): loses if SPX rises toward ATM
- A short bear call spread (buy ATM / sell upper): loses if SPX stays below ATM
Both sub-spreads lose maximum value when SPX pins at the ATM body, producing the short butterfly’s maximum loss. A decisive move in either direction collapses both sub-spreads toward zero and the trader keeps the net credit.
Defined risk on both sides: Unlike a short strangle — which also profits from SPX moving outside a range — the short butterfly has fully defined maximum loss. Both wing calls cap the loss from any SPX move. This makes it a defined-risk alternative to the short strangle for traders who want a large-move trade without unlimited downside.
Setup & Execution
Strike selection:
- Body (buy) at the current ATM strike — or the level you expect SPX not to pin at.
- Wings equidistant: same 25, 50, or 100-point spacing used for the long butterfly.
Expiration:
- 14–21 DTE. Shorter than the long butterfly because theta is working against you. At 30 DTE, daily theta drag is too costly if SPX stays near the body.
VIX at 22 is elevated — the wing premiums are rich, maximising the credit. Elevated IV also aligns with the position’s long-vega profile: if IV subsequently contracts, the two bought ATM calls lose value slower than the sold wing calls, benefiting the position.
| Leg | Strike | Action | Premium |
|---|---|---|---|
| Lower wing | 7,450 | Sell 1 call | +$9,800 |
| Body (ATM) | 7,500 | Buy 2 calls | −$14,000 |
| Upper wing | 7,550 | Sell 1 call | +$5,400 |
| Total | +$1,200 |
- Net credit: $12.00/share = $1,200 total received
- Max profit: +$1,200 (SPX at or beyond either wing at expiry)
- Max loss: −$3,800 (SPX pins at 7,500 — wing width $5,000 minus credit $1,200)
- Lower breakeven: 7,462 (lower wing 7,450 + credit 12 pts)
- Upper breakeven: 7,538 (upper wing 7,550 − credit 12 pts)
- Risk/reward: 1:3.2
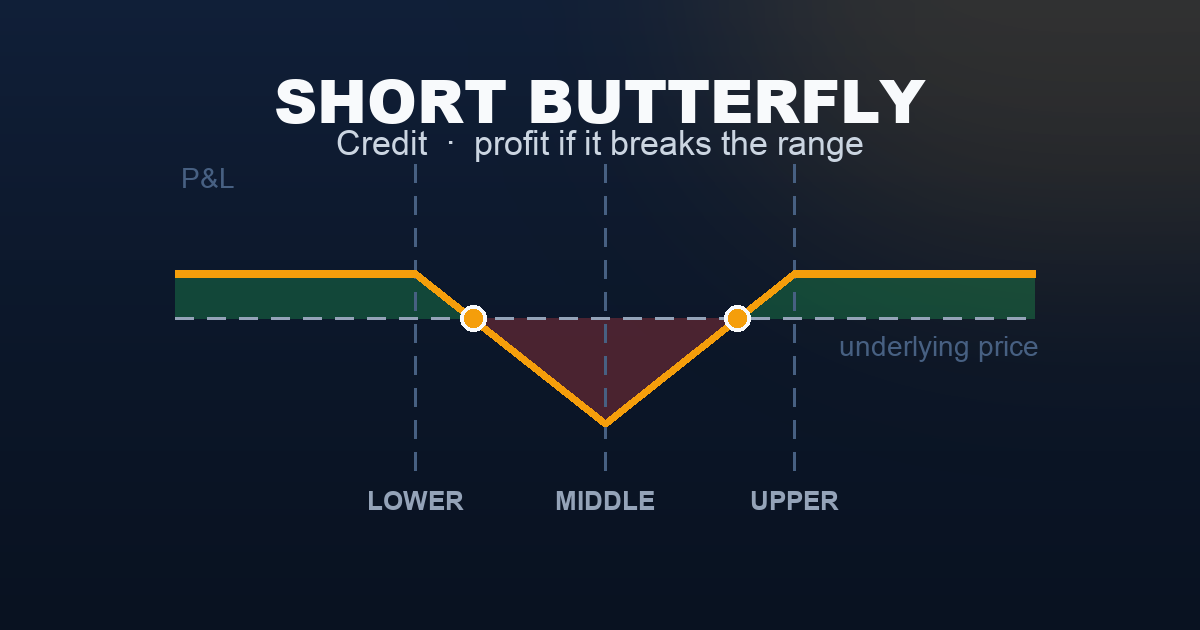
The Payoff Diagram

| SPX at Expiry | P&L |
|---|---|
| ≤ 7,450 | +$1,200 (max profit) |
| 7,462 (lower BE) | $0 |
| 7,475 | −$1,300 |
| 7,500 (ATM pin) | −$3,800 (max loss) |
| 7,525 | −$1,300 |
| 7,538 (upper BE) | $0 |
| ≥ 7,550 | +$1,200 (max profit) |
The valley (inverted tent) is the short butterfly’s signature — the exact mirror of the long butterfly’s hill. The green wings are thin (only $1,200 profit), while the red trough descends to −$3,800 at the ATM body. This visual asymmetry reflects the trade-off: high win probability, limited upside, large potential loss at the pin.
Long vs Short: Two Ways to Trade a Butterfly
| Short Butterfly (This Article) | Long Butterfly | |
|---|---|---|
| Structure | Sell 1 + Buy 2 + Sell 1 | Buy 1 + Sell 2 + Buy 1 |
| Net premium | +$1,200 credit | −$1,200 debit |
| Profit requires | SPX moves away from ATM | SPX pins at ATM at expiry |
| Max profit | +$1,200 (beyond either wing) | +$3,800 at exact ATM pin |
| Max loss | −$3,800 at ATM pin | −$1,200 anywhere beyond wings |
| Theta | Negative near ATM | Positive near ATM |
| Vega | Positive — enter in high IV | Negative — enter in low IV |
| Win rate | ~70–80% (wide zone) | ~20–30% (narrow zone) |
| Ideal market | Volatile, breakout expected | Tight range, pin expected |
Understanding the Greeks
Delta (near zero, mirror of long butterfly): At ATM entry, net delta is approximately zero. As SPX moves in either direction, delta turns in the direction of the move — the position gains directional exposure that works in its favour. This is the opposite of the long butterfly, which develops an adverse delta as SPX drifts from the body.
Gamma (positive near ATM — the defining characteristic): The two bought ATM calls have more gamma than the two sold wing calls. Net gamma is positive — the defining characteristic of the short butterfly. Unlike the iron condor or short strangle (gamma-negative, hurt by large moves), the short butterfly accelerates profits as SPX moves quickly away from 7,500. This positive gamma near the body is what makes the position profitable on breakouts.
Theta (negative near ATM — the daily cost): Because the two bought ATM calls have high theta, net theta is negative when SPX is near 7,500. Each day SPX stays pinned near the body, you lose theta. This is the central tension: positive gamma says large moves help; negative theta says time passing near the body costs you. The position is only theta-positive once SPX has moved well past the breakeven levels.
Vega (positive — enter in elevated IV): The two long ATM calls carry more vega than the two sold wing calls. Net vega is positive. An IV expansion after entry increases the position value even before SPX moves — the opposite of the long butterfly. Enter when VIX is elevated (above 18) with a catalyst expected. If IV collapses while SPX stays put, both negative theta and vega compression compound the loss.
Rho (near zero): Same offsetting structure as the long butterfly. Negligible for 14–21 DTE.
Trade Management
Take profit at 50–75% of initial credit ($600–$900): If SPX makes a decisive move and the butterfly can be closed for $300–$600, capture the gain. The final $300 requires the position to stay outside the wings through expiry — meaningful gamma risk if SPX reverses back toward the body.
Stop loss: close if the net loss reaches 2× the credit ($2,400): The maximum loss is $3,800 at the ATM pin. If the position loss reaches $2,400 (closing cost $3,600 against $1,200 credit received), exit. Negative theta near the body means the loss accelerates if SPX stays pinned.
Enter at elevated IV, not in calm markets: At VIX 22, the credit is $1,200. At VIX 14, the same structure might yield only $500 — a 1:7.6 risk/reward that is difficult to justify. Always verify IV is elevated relative to its recent range before entering.
Preferred DTE: 14–21 days: The short butterfly’s negative theta makes longer DTEs costly. At 30+ DTE, there is too much calendar time for SPX to pin at the body after an initial breakout. The 14–21 DTE window limits the theta drag window while allowing enough time for the thesis to play out.
No adjustments — exit the full position: Like the long butterfly, the three strikes are interlocked. Closing the two long ATM calls alone converts the position into a short strangle — unlimited risk. Always close all three legs simultaneously if the stop is triggered.
Real-World Example
Scenario A — The FOMC breakout (trade works)
VIX at 23.5 with 18 DTE to the monthly expiry. An FOMC meeting is scheduled in 3 days. SPX has been coiling in a 30-point range. The trader enters a short butterfly (7,450/7,500/7,550) for a net $1,350 credit — slightly richer than the standard example due to the elevated IV.
Day 4 (post-FOMC): The Fed signals two additional rate cuts — a dovish surprise. SPX rallies 88 points to 7,588, well beyond the upper wing at 7,550. The butterfly is worth $200 to close. The trader closes: $1,350 credit − $200 to close = +$1,150 profit (85% of credit captured in 4 days).
Scenario B — The non-event (trade loses)
Same entry at $1,200 credit. The FOMC meeting delivers no surprises — rates held, no new guidance. SPX barely moves. VIX compresses from 22 to 16 over the following 16 days as the pre-meeting fear premium evaporates. At expiry, SPX closes at 7,497.
At SPX 7,497 (3 points below the body):
- Short 7,450 call: $47 intrinsic. Collected $9,800, owe $4,700 on close. Gain: +$5,100.
- Long 2×7,500 calls: expire worthless (SPX below body). Paid $14,000. Loss: −$14,000.
- Short 7,550 call: expires worthless. Keep $5,400.
Net P&L: +$5,100 − $14,000 + $5,400 = −$3,500
The IV compression from 22 to 16 helped somewhat, but SPX sitting near the body delivered a near-maximum loss. Lesson: elevated IV at entry does not guarantee movement — if SPX simply calms without moving, both the vega tailwind and gamma edge are irrelevant.
When to Use
Best conditions:
- VIX is elevated (above 18) and a catalyst is approaching — FOMC, CPI, earnings season — where a large move in either direction is plausible
- SPX has been consolidating tightly and technical setup suggests a breakout is imminent
- You want defined-risk exposure to a large move without paying the debit cost of a long straddle or strangle
- A binary event has recently occurred (e.g., CPI miss) and residual volatility remains elevated
Avoid when:
- VIX is below 15 — the credit is too thin to justify the 3.2:1 max loss risk, and low-IV markets tend toward quiet consolidation
- SPX is in a slow, grinding trend — moderate drift without explosive moves produces no gamma benefit
- The known catalyst has already occurred and IV has begun to compress — you are entering after the best window
- You cannot monitor the position actively — a surprise calm spell can send the position toward max loss quickly
Strategy Ladder
The mirror: → Long Butterfly — buy the wings, sell the body, pay a debit. Profit only at the ATM pin. Positive theta near the body, negative vega. Enter in low IV when you have a specific pin target.
Uncapped large-move bet (simpler): → Long Straddle — buy ATM call and put. Unlimited profit from moves in either direction. No sold wings, no defined max loss on the long side. Higher debit but no wing management. Better when conviction on the magnitude of the move is very high.
Cheaper large-move exposure: → Long Strangle — buy OTM call and put. Lower debit than straddle, needs a larger move to profit. No complexity from managing sold wings.
Defined-risk neutral income: → Iron Condor — collect credit by selling an OTM strangle inside a long strangle. Positive theta, range-bound. The opposite of the short butterfly’s intent; useful when the view is that SPX will stay inside a wide range.
This content is for educational purposes only. Options trading involves significant risk of loss. Past performance is not indicative of future results. Always consult a licensed financial professional before trading.