30-Second Summary
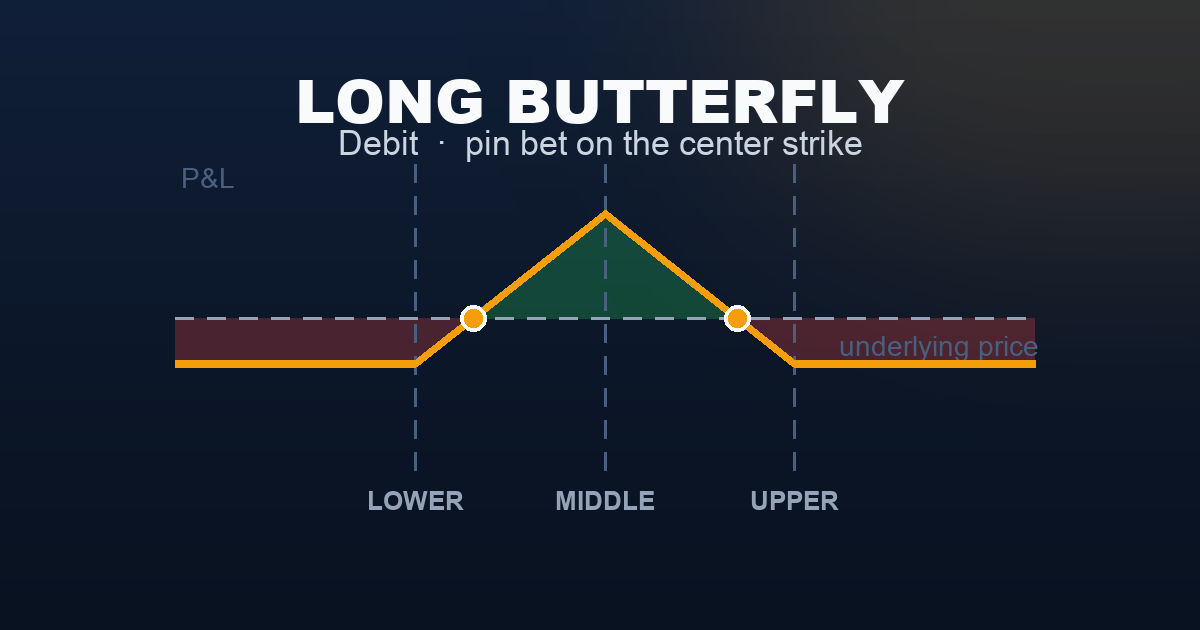
A long butterfly spread combines a bull call spread and a bear call spread at the same expiration, sharing a sold ATM body strike. The result: a small net debit, capped losses at the wings, and a single peak of maximum profit when the underlying pins exactly at the middle strike at expiration.
The long butterfly is unusual among buyer trades. It pays a debit yet profits in the same quiet, pinning environment that sellers prefer. Its edge: outstanding risk/reward at the pin (4:1 or better), achieved at low capital cost. Its limitation: the profit zone is narrow and the probability of achieving maximum profit is typically 20–30%.
| Structure | Buy 1 lower call + Sell 2 ATM calls + Buy 1 upper call |
| Cost | Net debit |
| Max profit | Wing width − debit (at the ATM pin) |
| Max loss | Net debit paid (at or beyond either wing) |
| Breakevens | Lower wing + debit pts / Upper wing − debit pts |
| Theta | Positive near ATM — time passing near the pin earns |
| Vega | Negative — IV expansion hurts; enter in low-IV environments |
| Best for | Precise pin forecasts; known support/resistance levels; post-event range compression |
What Is a Long Butterfly Spread?
A long butterfly spread uses three equidistant strikes in the same expiration:
- Lower wing (buy): 1 call below the current price
- Body (sell): 2 calls at the ATM price
- Upper wing (buy): 1 call above the current price
The structure decomposes into two spreads sharing the sold middle body:
- A bull call spread (buy lower / sell ATM): profits as the underlying rises toward ATM
- A bear call spread (sell ATM / buy upper): profits if the underlying stays below ATM
Both sub-spreads reach their combined maximum value only when the underlying pins exactly at the middle strike. Below the lower wing or above the upper wing, all options converge in value and the position loses only the net debit.
Call vs put butterfly: The same P&L profile can be built with all puts. For European-style index options like SPX, put-call parity makes both equivalent in theory. A mixed structure — sold ATM straddle flanked by a long OTM strangle — produces the same tent shape and is called an Iron Butterfly . The iron butterfly collects a larger credit but carries larger max loss; the all-call butterfly is better for precision low-cost pin trades.
Setup & Execution
Strike selection:
- Place the body (short strike) at or near the current ATM price — or at a price level expected to act as a pin (prior close, gamma-weighted pivot, key round number).
- Wings equidistant: 25, 50, or 100 points for SPX. Wider wings widen the breakeven range but increase the debit and reduce the risk/reward.
Expiration:
- 21–45 DTE for standard pin trades.
- 7–14 DTE for post-event setups where the catalyst has already resolved.
| Leg | Strike | Action | Premium |
|---|---|---|---|
| Lower wing | 7,450 | Buy 1 call | −$8,000 |
| Body (ATM) | 7,500 | Sell 2 calls | +$11,000 |
| Upper wing | 7,550 | Buy 1 call | −$4,200 |
| Total | −$1,200 |
- Net debit: $12.00/share = $1,200 total paid
- Max profit: +$3,800 (SPX pins at 7,500 — wing width $5,000 minus debit $1,200)
- Max loss: −$1,200 (SPX at or beyond either wing)
- Lower breakeven: 7,462 (lower wing 7,450 + debit 12 pts)
- Upper breakeven: 7,538 (upper wing 7,550 − debit 12 pts)
- Risk/reward at max profit: ~3.2:1
The Payoff Diagram

| SPX at Expiry | P&L |
|---|---|
| ≤ 7,450 | −$1,200 (max loss) |
| 7,462 (lower BE) | $0 |
| 7,475 | +$1,300 |
| 7,500 (ATM pin) | +$3,800 (max profit) |
| 7,525 | +$1,300 |
| 7,538 (upper BE) | $0 |
| ≥ 7,550 | −$1,200 (max loss) |
The tent shape is the butterfly’s signature. Unlike the iron condor’s flat profit plateau, the butterfly peaks at a single point. The loss wings are thin — max loss is only $1,200 — but so is the profit zone: only 76 points wide.
Long vs Short: Two Ways to Trade a Butterfly
| Long Butterfly (This Article) | Short Butterfly | |
|---|---|---|
| Structure | Buy 1 + Sell 2 + Buy 1 | Sell 1 + Buy 2 + Sell 1 |
| Net premium | −$1,200 debit | +$1,200 credit |
| Profit requires | SPX pins at ATM at expiry | SPX moves away from ATM |
| Max profit | +$3,800 at exact ATM pin | +$1,200 (beyond either wing) |
| Max loss | −$1,200 anywhere beyond wings | −$3,800 at ATM pin |
| Theta | Positive near ATM | Negative near ATM |
| Vega | Negative — enter in low IV | Positive — enter in high IV |
| Win rate | ~20–30% (narrow zone) | ~70–80% (wide zone) |
| Ideal market | Tight range, pin expected | Volatile, breakout expected |
The short butterfly wins more often but earns only $1,200. The long butterfly wins rarely but returns $3,800 when right. Expected value is similar; the choice is conviction level and preferred payout distribution.
Understanding the Greeks
Delta (near zero, shifts dynamically): At ATM entry, net delta is approximately zero. The two sold ATM calls dominate the position’s delta sensitivity. As SPX moves above 7,500, net delta turns negative (short body works against you); below 7,500, net delta turns slightly positive. The position is directionally neutral only at the pin, not over large moves.
Gamma (negative near ATM at expiration): The two short ATM calls have more gamma than the two long wing calls combined. Net gamma is negative near 7,500, especially in the final week. This means every 1-point SPX move near expiry produces an outsized loss. The long butterfly behaves exactly like a short straddle within the profit zone — the wings cap the loss but do not slow the gamma acceleration near the pin.
Theta (positive near ATM — unusual for a buyer trade): Unlike most debit trades, the long butterfly benefits from time passing when SPX is near the ATM strike. The two sold ATM calls decay faster than the two wing calls — this is the mechanism that drives the butterfly toward maximum value at expiry. This positive theta near the body makes the long butterfly one of the few buyer structures that does not fight time decay when on-target.
Vega (negative — enter in low-IV environments): Net vega is significantly negative. The two sold ATM calls carry more vega than the two long wing calls combined. An IV spike after entry makes the short calls expensive to close, producing a loss even without an SPX move. Enter when VIX is below 16 and not expected to spike. Avoid entries before events that could trigger IV expansion.
Rho (near zero): Interest rate sensitivity approximately offsets across the three strikes. Negligible for 21–30 DTE.
Trade Management
Take profit at 25–40% of maximum potential — or hold for the pin: The max theoretical profit is $3,800. If the butterfly reaches $2,000–$2,500 in value (from $1,200 cost) with SPX near 7,500 and 5–7 DTE remaining, closing is rational. The final profit requires an exact pin and carries maximum gamma risk. Aggressive traders hold for the full $3,800 only if SPX is within 5 points of the body in the final 3 days.
Stop loss: close if the position loses 50% of the debit ($600): If the butterfly falls to $600 value from a $1,200 cost, the range thesis has broken. Close and reassess. The butterfly cannot be repaired — do not attempt to roll individual legs, as this changes the structure entirely.
Do not enter with SPX more than 15–20 points from the body strike: The breakeven range is only 76 points wide. Entering 25+ points off-centre means SPX must first move back before any profit is possible.
Avoid entering before known volatility events: Any Fed decision, CPI, or NFP scheduled before expiration can spike IV and gap SPX away from the pin. Check the macro calendar before entry.
No adjustments — butterflies are fixed structures: Unlike an iron condor (where individual spreads can be rolled independently), the butterfly’s three strikes are interlocked. Rolling a tested wing transforms the position into a different structure. Accept the loss at the stop and exit cleanly.
Real-World Example
Scenario A — The post-FOMC pin (trade works)
The Fed held rates with a balanced statement. SPX settled exactly at 7,500 — the round number. VIX dropped from 18 to 15.2 on the post-announcement session. Daily ranges have been under 20 points for five consecutive sessions. No further macro events for 28 days. The trader enters the butterfly for a $1,180 net debit (slight price improvement).
Day 22: SPX at 7,503 — 3 points above the body, inside the breakeven range. The butterfly is worth $2,900. Close: $2,900 − $1,180 = +$1,720 profit (146% return on capital). The final 8 days of gamma risk are not worth chasing.
Scenario B — The jobs report gap (trade loses)
Same entry. On Day 8, a stronger-than-expected jobs report pushes SPX up 74 points to 7,574 — 24 points above the upper wing at 7,550. The butterfly collapses as both sub-spreads reach maximum loss. The position is worth $320. The trader closes: $1,180 − $320 = −$860 loss. SPX never returned to the profit zone.
When to Use
Best conditions:
- SPX is consolidating near a well-defined price level with limited daily range
- VIX is below 16 — low IV reduces the debit and minimises the vega penalty
- No macro events fall within the expiry window
- You have a specific price target, not just a vague neutral view — the long butterfly requires precision
- Entering within 21–30 DTE, close enough for theta to matter
Avoid when:
- VIX is above 18 — the debit increases and the short ATM calls carry elevated vega risk
- SPX is in a sustained trend — even a slow 30-point drift over 30 days reaches max loss
- A known volatility event falls inside the expiry window — IV spikes destroy the vega-negative position before the pin can materialise
- Bid-ask spreads are wide — the three-leg structure amplifies slippage on both entry and exit
Strategy Ladder
The prerequisite structures: → Bull Call Spread + Bear Call Spread — a long butterfly is exactly these two spreads combined at a shared middle strike. Master the sub-spreads before trading the butterfly.
The mirror: → Short Butterfly — sell the wings, buy the body, collect the credit. Profit when SPX moves away from ATM. Same strikes, inverted P&L, completely different thesis.
The mixed-leg version: → Iron Butterfly — sells an ATM straddle (call + put) flanked by a long OTM strangle. Same tent shape, larger credit, larger max loss. More capital-efficient for premium sellers; the all-call butterfly is better for precision low-cost pin trades.
The uncapped version: → Long Straddle — buy both ATM call and put with no short wings. Profits are uncapped in both directions. No positive theta, no defined-risk benefit — a pure volatility buy. The butterfly suits high pin conviction; the straddle suits high movement conviction.
This content is for educational purposes only. Options trading involves significant risk of loss. Past performance is not indicative of future results. Always consult a licensed financial professional before trading.