30-Second Summary
A long iron butterfly pays a net debit to own an at-the-money straddle — maximum exposure to movement in either direction — while selling OTM wings to reduce the cost. If the underlying makes a large enough move past either wing at expiration, the long straddle component profits more than the debit paid. If the underlying stays near the strike, the straddle expires worthless and the full debit is lost.
This is a buyer’s structure — maximum sensitivity to movement, maximum hostility from theta. It is the exact mirror image of the Iron Butterfly (the seller’s version): same four strikes, opposite payoffs. It is the capped version of the Long Straddle — cheaper debit, but profit is capped once SPX reaches the short wings.
What Is a Long Iron Butterfly?
The long iron butterfly buys an ATM straddle and simultaneously sells OTM wings to reduce the net cost:
- Inner legs: Buy 1 ATM call + Buy 1 ATM put — same strike, same expiry. This is the straddle component that profits from large moves in either direction.
- Outer legs: Sell 1 OTM call + Sell 1 OTM put — the wings that reduce the debit at the cost of capping maximum profit.
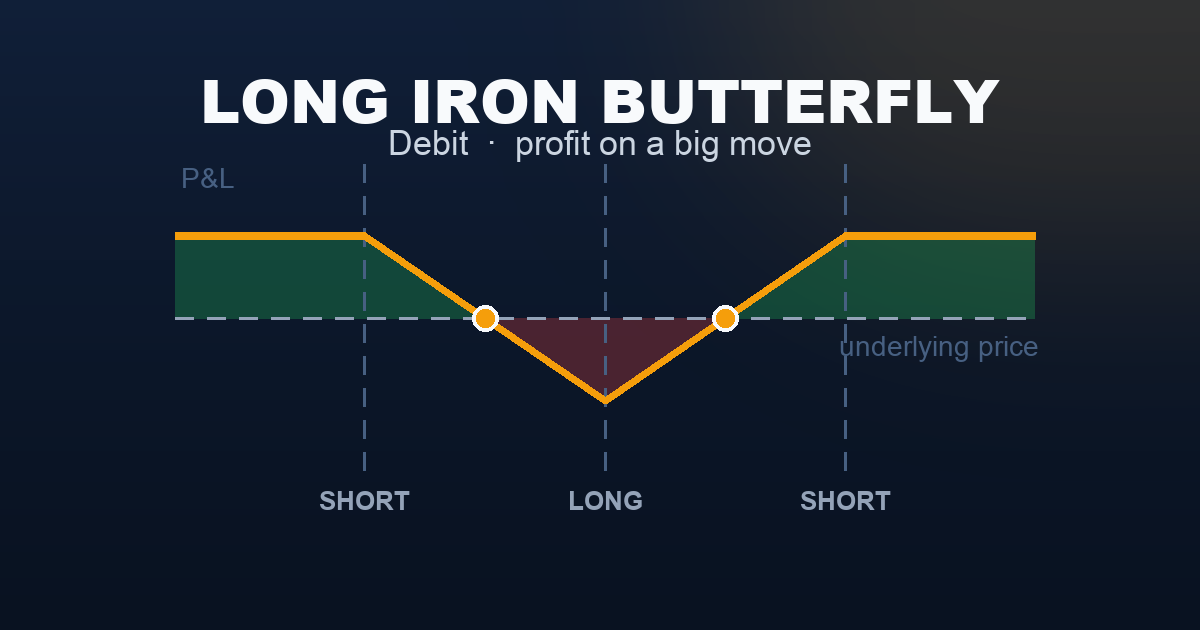
The structure produces an inverted tent (W shape with flat profit caps at the wing level): maximum loss at the ATM pin, rising to profit zones on both sides, capped flat once SPX moves past either wing.
Compare this to the Long Iron Condor : a long iron condor buys OTM options (the long strikes start away from ATM), with a wider debit loss zone in the middle. The long iron butterfly brings the long strikes all the way to ATM — lower debit than the straddle alone, but SPX must clear 50 points from the ATM strike before reaching maximum profit. The trade requires a more decisive move than a long condor, but the debit is lower.
The key question: will SPX make a move large enough to pass one of the short wings (5,100 or 5,300 in this example) before expiration? If yes — maximum profit. If SPX pins near 5,200 — the full debit is lost.
Setup & Execution
Legs:
- Leg 1 (Buy): 1 ATM call at the current price strike
- Leg 2 (Buy): 1 ATM put at the same ATM strike
- Leg 3 (Sell): 1 OTM call at the upper wing strike (caps upside profit, reduces cost)
- Leg 4 (Sell): 1 OTM put at the lower wing strike (caps downside profit, reduces cost)
All four legs: same underlying, same expiration.
Strike selection:
- Long strikes (inner): Always at-the-money — buy maximum extrinsic value and maximum gamma.
- Short strikes (outer wings): OTM at the target move level. Narrower wings = lower debit, lower max profit, more achievable target. Wider wings = higher max profit, higher debit.
- Symmetry: Wings equidistant from ATM for a non-directional structure.
Expiration selection:
- 7–21 DTE: Standard window — close to the catalyst, fast resolution. Theta is hostile enough that multi-week holds are rarely justified without a specific upcoming event.
- 0 DTE: Extreme case for same-day event plays. Pure binary outcome.
- 30+ DTE: Rarely useful — theta is severely hostile to long ATM options over extended periods.
SPX Example — Entry:
Trade:
| Leg | Strike | Action | Premium |
|---|---|---|---|
| Long call | 5,200 | Buy | −$3,800 |
| Long put | 5,200 | Buy | −$3,200 |
| Short call | 5,300 | Sell | +$1,000 |
| Short put | 5,100 | Sell | +$1,000 |
| Total | −$5,000 |
- Net debit: $50.00 per contract = $5,000 total paid
- Max profit (either wing): ($100 wing width − $50 debit) × 100 = $5,000
- Upper breakeven: 5,200 + 50 = 5,250
- Lower breakeven: 5,200 − 50 = 5,150
- Max loss: $5,000 (the net debit — when SPX pins exactly at 5,200)
For any profit at expiration, SPX must close outside 5,150 or 5,250. For maximum profit, SPX must close at or beyond 5,300 (upper) or 5,100 (lower) — a move of 100 points (1.92%) from entry.
The Payoff Diagram

| SPX at Expiry | P&L |
|---|---|
| 5,050 | +$5,000 (max profit, lower wing) |
| 5,100 (short put) | +$5,000 (max profit) |
| 5,150 (lower breakeven) | $0 |
| 5,200 (ATM — max loss) | −$5,000 |
| 5,250 (upper breakeven) | $0 |
| 5,300 (short call) | +$5,000 (max profit) |
| 5,350 | +$5,000 (max profit, upper wing) |
The inverted tent (W shape with flat profit caps) is the long iron butterfly’s signature — the exact mirror of the short iron butterfly’s Λ. Maximum loss occurs only at the ATM pin. Profit rises on both sides to the wing levels, then plateaus.
The Buyer vs Seller Reality
| Long Iron Butterfly (Buyer — this article) | Iron Butterfly (Seller) | |
|---|---|---|
| Probability of Profit | ~35–45% | ~55–65% |
| Max Profit | $5,000 (move past either wing) | $5,000 (ATM pin) |
| Max Loss | $5,000 (ATM pin) | $5,000 (move past either wing) |
| Profit zone | Outside both breakevens | Between both breakevens |
| Theta | Enemy — costs every day | Ally — earns every day |
| Vega | Ally — rising IV helps | Enemy — rising IV hurts |
| Ideal condition | Volatile, large move expected | Calm, pinning, low-vol |
The buyer wins less often but needs only one significant directional move to capture maximum profit. The seller’s edge is frequency; the buyer’s edge is magnitude. Long iron butterfly positions are typically held for a short duration — enter before the catalyst, exit once the move materialises (or once the catalyst passes without a move).
Understanding the Greeks
Net Delta (near zero at entry): The long ATM call (delta ≈ +0.50) and long ATM put (delta ≈ −0.50) roughly cancel at entry. As SPX moves toward either wing, net delta grows in the direction of movement — the position self-accelerates toward profit. This delta drift compounds with positive gamma.
Net Gamma (strongly positive — the profit amplifier): Long ATM options carry the highest gamma of any strike. Owning both produces maximum positive gamma. Positive gamma means the position gains delta in the direction of any move — every additional point SPX travels pays more than the previous one, up to the wing cap. The underlying doesn’t just need to move; it benefits more the faster and further it moves (capped at the short wings).
Net Theta (strongly negative — the primary cost): Two long ATM options produce the maximum possible theta drain for a 4-leg structure. For a $5,000 debit at 14 DTE, net theta costs approximately $150–$250 per calendar day. Every day SPX fails to move meaningfully is a significant loss. This is why long iron butterflies are used in the days immediately before an expected catalyst — not as multi-week holds.
Net Vega (strongly positive — the IV ally): Two long ATM options = maximum positive vega. If VIX rises after entry — even without SPX moving — the mark-to-market value of the position rises. Entering before a volatility event when VIX is still subdued produces a double tailwind when the event fires: SPX moves (intrinsic gain) plus VIX spikes (extrinsic gain). The worst entry: high IV that subsequently collapses — the buyer loses from vega even if SPX moves somewhat.
Net Rho (≈ 0): The long call’s positive rho and long put’s negative rho approximately cancel at the same ATM strike. Negligible for 14 DTE structures.
Trade Management
Take profits at 50–70% of maximum gain: If the butterfly is worth $3,500–$4,000 after a large SPX move, close it. Don’t hold for the final $1,000–$1,500 — mean reversion and theta will erode gains once the directional move stalls. The goal is to capture the event surge, not hold to expiration.
Cut losses if the catalyst passes without a move: If the catalyst resolves with SPX near 5,200, close the position the same day. A quiet event means theta continues eroding the debit with no recovery path. A $1,500 early exit beats a $5,000 maximum loss held to expiration.
Never hold to expiration when in the loss zone: A long iron butterfly that’s losing near expiration with SPX between the breakevens has no positive gamma recovery path left. Close before the final 3–5 days.
Do not re-enter after a failed catalyst: If the expected event passes quietly, the rationale for the trade is gone. Rolling to a later expiration hoping for a delayed move compounds losses through additional theta drain.
Real-World Example
Scenario A — FOMC surprise (the winning trade):
FOMC decision is due in 2 days. VIX at 18 is relatively subdued for a Fed week — option premiums haven’t fully priced in event risk. A long iron butterfly is bought for $5,000.
Day 2 (post-FOMC): The Fed held rates but issued a hawkish statement signalling no cuts for the year. SPX dropped 88 points to 5,114 — through the lower breakeven of 5,150, approaching the short put wing at 5,100.
At SPX 5,114 (86 points below ATM, 14 above the short put):
- Long put (5,200 strike): worth approximately $9,000 ($86 intrinsic + residual time value)
- Short put (5,100 strike): worth approximately $300 (14 points OTM, residual time value)
- Both call legs: nearly worthless
- Butterfly value: $8,700
- Original debit: $5,000
- Net P&L: +$3,700 (74% of max profit)
Close immediately — don’t wait for SPX to reach 5,100 for the final $1,300 gain. Theta and mean reversion can give back gains once the directional move stalls.
Scenario B — Quiet market (25bp cut priced in):
The Fed delivered the expected 25bp cut. SPX barely moved — from 5,202 to 5,218 over the next 3 days. VIX drifted from 18 to 15 (IV collapse).
With 4 DTE and SPX at 5,218 (inside the profit zone boundary at 5,250):
- Both long ATM options have lost most of their value to theta and IV collapse
- Short wings: nearly worthless (far OTM)
- Butterfly worth approximately $1,400 to close
- Net loss: −$3,600 (72% of max loss)
The catalyst was priced in. Close immediately — each remaining day costs another $150–$250 in theta with no recovery path. Do not hold to expiration.
When to Use This Strategy
Best conditions:
- A specific, identifiable catalyst is imminent — FOMC decision, CPI release, major earnings, election results
- VIX is relatively low before the event — option premiums haven’t yet priced in the expected volatility spike
- Direction of the move is genuinely uncertain — if you have a strong directional view, a vertical spread captures more of that edge
- The expected move magnitude exceeds the breakeven distance (50 points here)
Avoid when:
- VIX is already elevated — paying inflated premiums for a move that may already be priced in; the vega drag on entry works against you immediately
- No specific catalyst is identified — without a reason for a large move, theta destroys the position steadily with no catalyst to save it
- Holding through multiple events — theta makes multi-week long butterfly holds prohibitively expensive
Compared to Long Straddle: The Long Straddle is uncapped in both directions — unlimited profit potential on the upside, very large on the downside. The long iron butterfly caps that profit at the short wing level. The trade-off: the butterfly costs less (wings reduce the debit) but requires a larger move to reach its profit cap.
Compared to Long Iron Condor: The Long Iron Condor places its long strikes OTM — the profit zones start closer to the current price, requiring a smaller move. The long iron butterfly requires a larger move (to the short wings 100 points away) but pays a lower debit. It is more efficient per dollar at risk once the move exceeds the wing level.
Strategy Ladder — Next Steps
Uncapped version: → Long Straddle — remove the short wings. Pays more debit but profit is unlimited on the upside and uncapped on the downside. Used when the expected move is very large.
Wider strike version: → Long Strangle — buy OTM call and put instead of ATM. Lower debit, needs a bigger move, still uncapped.
The seller-side mirror: → Iron Butterfly — sell the same four strikes. Collect the debit as credit, profit if SPX stays near ATM. Same strikes, inverted payoff.
The wider buyer version: → Long Iron Condor — move both long strikes OTM. Profit zones start closer to the current price, but max profit per dollar is lower.
This content is for educational purposes only. Options trading involves significant risk of loss. Past performance is not indicative of future results.