30-Second Summary
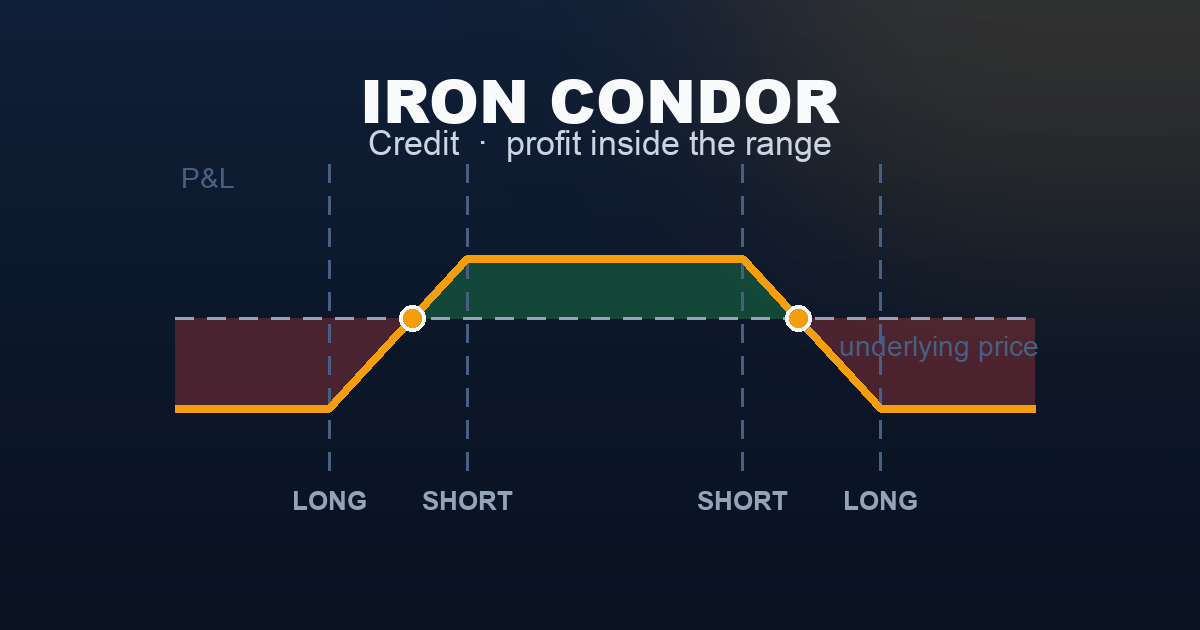
An iron condor sells four options simultaneously: an OTM call spread above the current price and an OTM put spread below it. You collect a net credit upfront. If the underlying stays between your two short strikes at expiration, both spreads expire worthless and you keep the full credit. If the underlying breaks through either short strike, you start losing — and if it breaks the corresponding long strike, you’ve hit the maximum loss for that wing.
This is a seller’s strategy that wins in sideways, stable markets. Theta works for you on all four legs. You don’t need the market to move in any direction — you need it to not move too far in either direction.
This is also the core strategy of this site. Every article in Levels 1 and 2 built toward understanding this structure.
What Is an Iron Condor?
An iron condor combines two strategies from Level 2 into a single four-leg position:
- Upper wing: A Bear Call Spread above the current price — sell a call, buy a higher-strike call for protection
- Lower wing: A Bull Put Spread below the current price — sell a put, buy a lower-strike put for protection
Together, these two credit spreads bracket the current price. You collect premium from both sides. The profit zone is the space between the two short strikes. The loss zones lie beyond the long strikes on either side.
The name condor refers to the payoff shape — a wide, flat body (the profit plateau) flanked by two wings (the loss zones on each side). The iron prefix distinguishes it from a plain condor, which uses only calls or only puts; the iron condor uses both, one side for each.
Think of it this way: you are simultaneously selling two things:
- The probability that SPX rallies significantly (the bear call spread)
- The probability that SPX falls significantly (the bull put spread)
If neither happens — if SPX stays in a range — you keep both premiums.
The key phrase: you are selling the market’s fear of movement. The premium you collect represents what option buyers will pay to insure against or speculate on large moves. If the market stays calm, that fear was overpriced and you profit. If the market makes a large move, that fear was correctly priced and the buyer profits.
Setup & Execution
Legs:
- Leg 1 (Sell): 1 OTM call at the upper short strike
- Leg 2 (Buy): 1 OTM call at the upper long strike — protection that caps the call-side loss
- Leg 3 (Sell): 1 OTM put at the lower short strike
- Leg 4 (Buy): 1 OTM put at the lower long strike — protection that caps the put-side loss
All four legs: same underlying, same expiration.
Strike selection:
- Short strike delta target: Most systematic sellers target the 15–30 delta range. A 20-delta short strike carries roughly an 80% probability of expiring worthless. Tighter short strikes (closer to ATM) collect more premium but reduce the profit zone and increase adjustment frequency. For 0DTE SPX trading specifically, 8–16 delta short strikes are common — the 0DTE Iron Condor guide covers those parameters in detail.
- Wing width: The distance between the short and long strike on each side — typically 25–50 points on SPX. Wider wings collect more credit but carry larger maximum loss. Most 30 DTE condors use 25–50 point wings.
- Symmetric vs asymmetric: A symmetric condor places both short strikes equidistant from the current price — a neutral, non-directional structure. An asymmetric condor shifts one side closer (collecting more premium on that side) when the trader has a slight directional lean.
Expiration selection:
- 30–45 DTE: The standard window for swing-style condors. Enough premium to justify the structure, enough time to manage if the market moves.
- 7–21 DTE: Faster theta decay, shorter capital commitment, more management required.
- 0 DTE (same-day): Enter in the morning, expire at close. Maximum theta per hour, maximum intraday gamma risk. See the 0DTE Iron Condor guide for full operational detail.
SPX Example — Entry:
Trade:
| Leg | Strike | Action | Premium |
|---|---|---|---|
| Short call | 7,550 | Sell | +$1,400 |
| Long call | 7,600 | Buy | −$550 |
| Short put | 7,450 | Sell | +$1,400 |
| Long put | 7,400 | Buy | −$550 |
| Total | +$1,700 |
- Net credit: $17.00 per contract = $1,700 total received
- Max profit: $1,700 (SPX stays between 7,450 and 7,550 at expiry)
- Upper breakeven: 7,550 + 17 = 7,567
- Lower breakeven: 7,450 − 17 = 7,433
- Max loss (either wing): ($50 spread width − $17 credit) × 100 = $3,300
For maximum profit, SPX must close between 7,450 and 7,550 at expiration — a 100-point wide profit zone centred over the current price.
The Payoff Diagram

| SPX at Expiry | P&L |
|---|---|
| 7,350 | −$3,300 (max loss, lower wing) |
| 7,400 (long put) | −$3,300 (max loss) |
| 7,433 (lower breakeven) | $0 |
| 7,450 (short put) | +$1,700 (max profit) |
| 7,500 (entry) | +$1,700 (max profit) |
| 7,550 (short call) | +$1,700 (max profit) |
| 7,567 (upper breakeven) | $0 |
| 7,600 (long call) | −$3,300 (max loss) |
| 7,650 | −$3,300 (max loss, upper wing) |
The flat profit plateau between the two short strikes is the signature of the iron condor. Both wings enter from below the chart because the maximum loss of $3,300 exceeds the chart scale — the long strikes cap the losses there. Only one wing can trigger maximum loss at expiration: SPX cannot simultaneously be above 7,600 and below 7,400.
Short vs Long: Two Ways to Trade a Condor
The iron condor can be traded from either side. This article covers the short iron condor — sell four options, collect a net credit, profit if SPX stays inside the range. There is a mirror-image version called the Long Iron Condor — buy four options, pay a net debit, profit if SPX makes a large move in either direction.
Same four strikes, same expiration. Opposite payoffs.
| Short Iron Condor (This Article) | Long Iron Condor | |
|---|---|---|
| Structure | Sell condor — receive credit | Buy condor — pay debit |
| Net premium | +$1,700 collected | −$1,700 paid |
| Profit requires | SPX stays inside the range | SPX breaks outside the range |
| Max profit | $1,700 | $3,300 |
| Max loss | $3,300 | $1,700 |
| Theta | Strongly positive — earns each day | Strongly negative — costs each day |
| Vega | Negative — hurt by rising IV | Positive — benefits from rising IV |
| Ideal condition | Calm, range-bound market | Volatile, pre-event, trending |
| Who wins more often | Seller (~55–65%) | — |
| Who wins bigger | — | Buyer (+$3,300 max) |
Most income-focused traders run the short version — theta positive, high-probability, systematic. The long condor is used before binary events (earnings, FOMC, elections) when a large move is expected but direction is uncertain.
→ Long Iron Condor — full article : setup, inverted payoff diagram, when to use the debit version.
Understanding the Greeks
Net Delta (near zero when balanced): The four legs partially cancel each other’s delta. A symmetric condor centred over the current price has net delta close to zero — the position is approximately non-directional. As SPX moves toward either short strike, net delta shifts: approaching the short call pushes delta negative (accelerating losses), approaching the short put pushes delta positive. Delta management means keeping the condor roughly centred as the market moves.
Net Theta (strongly positive — your most reliable ally): The two short options earn significantly more theta than the two long options pay. For a 30 DTE condor collecting $1,700 credit, net theta might earn $20–$35 per day. Every day SPX stays inside the profit zone is income. The iron condor earns from two positions simultaneously — the highest aggregate theta of any strategy in this series.
Net Vega (strongly negative — your most dangerous enemy): The short options are short vega; the long options are long vega but with less exposure. Net vega is significantly negative. If VIX rises sharply after entry — even if SPX doesn’t move — both short strikes become more expensive to close, producing large unrealised losses. This is the central risk: the condor can be losing money before SPX has moved at all. Entering when VIX is elevated and likely to mean-revert is ideal. Entering after a VIX spike risks the double-whammy of price movement and IV expansion.
Net Gamma (negative — accelerates losses near the short strikes): Short options carry more gamma than long options at the same DTE. Net gamma is negative. As expiration approaches with SPX near either short strike, the position’s delta changes rapidly — small SPX moves create disproportionately large P&L swings. This is the principal reason systematic sellers exit at 50% profit or 21 DTE: to leave before the most dangerous gamma environment builds.
Net Rho (near zero): The call-side rho and put-side rho approximately offset each other in a symmetric condor. Negligible in practice.
Trade Management & Adjustments
The iron condor requires more active management than any strategy in Levels 1 or 2. Having four legs and two potential threat directions means decisions arise regularly. The rules below form the baseline of a systematic approach.
Rule 1 — Profit target: close at 50% of max credit
If you collected $1,700 and the condor is now worth $850 to close, take it. You’ve captured half the maximum profit with substantially less time remaining. The final $850 requires holding through the most dangerous gamma window near expiration — rarely worth the risk. Closing at 50% and redeploying is the systematic default.
Rule 2 — Stop loss: 200% of credit collected
If closing the condor now would cost $3,400 (your $1,700 credit plus a further $1,700 loss), close immediately. This prevents a bad trade from reaching maximum loss. Many traders also apply a per-wing stop: if either spread individually reaches 2× its credit, close that wing regardless of the other side.
Rule 3 — Time-based close: 21 DTE
Close the entire condor at 21 days remaining regardless of P&L. The final three weeks produce rapidly accelerating gamma risk. The incremental premium gain from holding longer is almost never worth it. For 0DTE condors, this rule is replaced by a time-of-day close: no later than 3:45 PM ET.
Rule 4 — Defending a threatened wing (one-sided adjustments)
When one side is under pressure but the stop has not triggered:
- Roll the threatened spread — buy back the tested spread and sell a new one at a further strike and/or later expiration. This moves the short strike away from the market and collects additional credit. Only roll if you still believe the move will stall.
- Leave the winning side alone — the unthreatened spread is decaying toward zero. Closing it early gives back premium for nothing. Let it run unless the entire condor is being closed.
- Use the winning side to fund the losing side — if the put spread has nearly expired worthless, the credit from closing it early is often small. But in a fast-moving market, closing the winning side and using the proceeds to partially offset the losing-side adjustment is a valid capital-management move.
Rule 5 — Maximum number of rolls: two
Roll a tested wing once or twice at most. If you’ve rolled the call spread up twice and SPX keeps rallying, the trade is fundamentally broken. Close the entire position, take the loss, and move on. Rolling a losing condor into a progressively larger position is one of the most common account-destroying habits in options trading.
Position sizing: the critical multiplier
One maximum-loss event ($3,300) erases approximately two maximum-profit trades ($1,700 each) minus one. The only way this math works long-term is through consistent position sizing. Risk no more than 2–5% of account equity per condor. Running multiple condors at once multiplies both the income potential and the correlated loss risk — markets that breach one condor tend to breach all of them simultaneously.
Real-World Example
The trade: SPX has been range-bound for three weeks. VIX at 19.5 is slightly above its 30-day average, offering better-than-normal premium. No major catalyst is scheduled in the next 30 days. The setup is favourable: elevated IV, calm price action, defined range.
- Sell SPX 7,550 Call + Buy SPX 7,600 Call: credit $9.50 = $950
- Sell SPX 7,450 Put + Buy SPX 7,400 Put: credit $9.50 = $950
- Total credit: $19.00 = $1,900
- Profit zone: 7,431 to 7,569
- Max loss: ($50 − $19) × 100 = $3,100
Day 14: SPX at 7,512. VIX has drifted from 19.5 to 16.8. Both spreads have decayed — IV crush accelerated the decay beyond what theta alone would explain. The condor is now worth $9.50 to close.
- Cost to close: $950
- Original credit: $1,900
- Net profit: +$950 (50% of max)
→ Close. Position closed in 14 days, capturing 50% of maximum in half the time.
The stress scenario (what Day 10 looked like before the drift lower):
On Day 8, SPX briefly spiked to 7,552 — 2 points through the short call strike. The call spread alone was worth $4.20 (up from zero). The put spread had decayed to $0.80. Total condor value: $5.00, still below original $19 credit (position net-profitable if closed). The trader held.
Two days later SPX pulled back to 7,531. By Day 14 the trade was at the 50% target.
If SPX had instead continued to 7,580:
- Call spread would approach full loss ($50 intrinsic − $9.50 credit = $4,050 loss on that wing alone)
- Put spread contributes: +$950 offset
- Net loss approaching: $3,100 (max)
- Correct action at stop (condor worth 2× credit): close entire position, accept the loss
One loss at $3,100 requires approximately three max wins at $950 to recover. Position sizing that allows only one condor of this size relative to account equity is the difference between a recoverable setback and an account-ending event.
When to Use This Strategy
Best conditions:
- SPX is in a defined range with clear support and resistance levels that serve as natural short-strike anchors
- VIX is elevated (18–28) — higher IV means more premium collected for the same strike distance, and any subsequent IV mean-reversion accelerates the condor’s decay
- No major macro catalysts (FOMC, CPI, non-farm payrolls) within the expiration window — these events can gap SPX through a short strike in a single session
- You have a systematic entry and exit process — the iron condor rewards consistency, not individual judgment on each trade
Avoid when:
- SPX is in a confirmed trend — selling iron condors into a trending market means one wing is continuously threatened
- VIX is below 14 — thin premiums barely justify the four-legged overhead; the risk/reward is poor
- A known binary event is inside the window — earnings season for major index constituents, Fed decisions, elections
- You don’t have active monitoring capacity — the condor requires attention, especially in the final two weeks
Ideal VIX level: 18–28. This range offers enough premium to justify the structure (typically 20–30% of spread width as credit) while staying below the chaotic environment of VIX 30+ where moves become unpredictable and wings breach frequently.
The iron condor is a consistency strategy, not a lottery. A 60% annual win rate with disciplined stops and proper position sizing builds an account over time. A 90% win rate with oversized positions erases months of work in a single day.
Strategy Ladder — Next Steps
Built from: Bull Put Spread + Bear Call Spread — the iron condor is exactly these two strategies run simultaneously. If you understand both component spreads, you understand the iron condor.
The opposite version: → Long Iron Condor — pay a debit, profit from a large move in either direction. Same strikes, inverted payoff.
The tighter version: → Iron Butterfly — move both short strikes to the same ATM strike. Collects significantly more credit but narrows the profit zone to a single point (the ATM pin). Higher reward per win, much lower probability of winning, maximum management intensity. Its buyer-side mirror: Long Iron Butterfly — pay a debit, profit if SPX breaks decisively past either wing.
The vega plays:
- Long volatility view? → Long Straddle — buy both an ATM call and put, profit from any large move
- Directional but want to sell premium? → Short Strangle — the uncapped version of the iron condor; higher credit, undefined max loss
The site’s application: The 0DTE Iron Condor guide covers the full operational system for running this strategy intraday on SPX — entry timing, 0DTE-specific strike selection, position sizing, and a real trade log.
This content is for educational purposes only. Options trading involves significant risk of loss. Past performance is not indicative of future results.