30-Second Summary
An iron butterfly sells an at-the-money call and put simultaneously — collecting the maximum possible premium from a straddle — then buys OTM call and put options to cap the loss on either side. You receive a large net credit upfront. If the underlying pins near the short strike at expiration, both ATM options decay to zero and you keep the entire credit. If the underlying moves past either breakeven, the profit erodes; past either long strike, you’ve hit maximum loss.
This is the highest-premium, highest-risk-per-dollar-collected seller’s structure. It is the defined-risk version of the Short Straddle — same short ATM straddle, protective wings added. And it is the mirror image of the Long Iron Butterfly — same four strikes, opposite payoffs.
What Is an Iron Butterfly?
The iron butterfly combines a short straddle (two ATM short options) with a long strangle (two OTM long options for protection):
- Inner legs: Sell 1 ATM call + Sell 1 ATM put — same strike, same expiry. This is the straddle component that collects maximum premium.
- Outer legs: Buy 1 OTM call + Buy 1 OTM put — the wings that cap maximum loss.
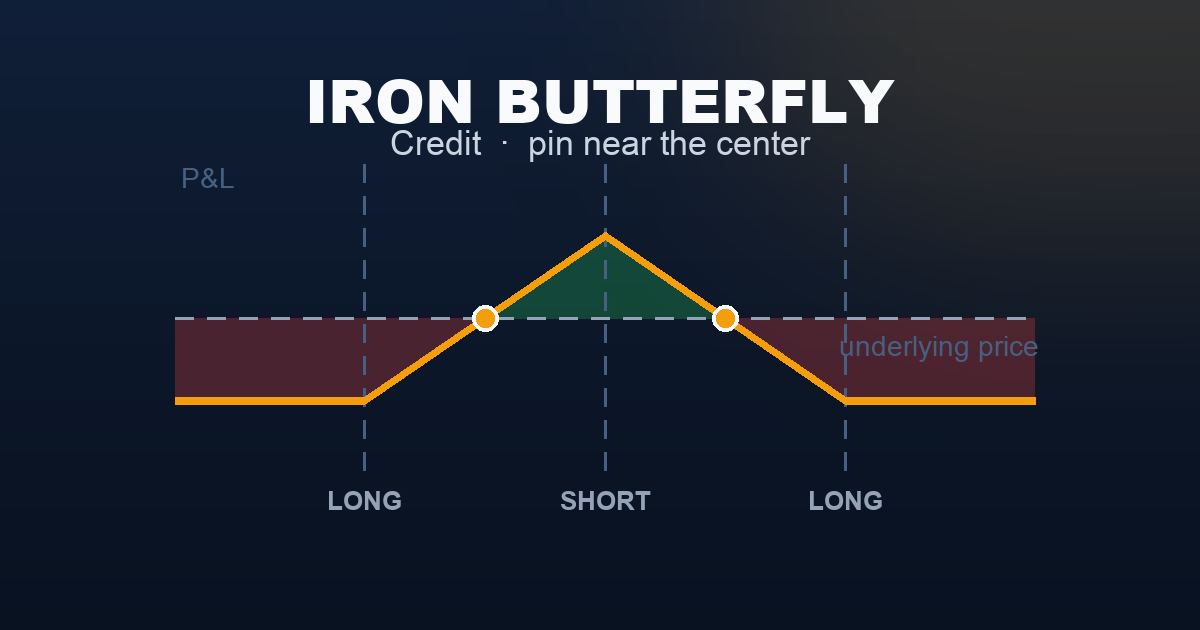
The structure produces a tent-shaped (Λ) payoff: a single profit peak at the ATM strike, sloping down symmetrically to flat maximum-loss zones beyond the long strikes.
Compare this to the Iron Condor : an iron condor has two short strikes separated by a 100-point profit range. An iron butterfly collapses that range to a single point — both short strikes are at the same ATM level. This collects far more credit but leaves almost no margin for the underlying to move.
The trade-off: the iron butterfly has a much lower probability of achieving full maximum profit, but when the market does stay calm and pins near ATM, the premium collected is substantial — typically 2–4× what an iron condor of the same wing width produces.
Setup & Execution
Legs:
- Leg 1 (Sell): 1 ATM call at the current price strike
- Leg 2 (Sell): 1 ATM put at the same ATM strike
- Leg 3 (Buy): 1 OTM call at the upper wing strike (protection)
- Leg 4 (Buy): 1 OTM put at the lower wing strike (protection)
All four legs: same underlying, same expiration.
Strike selection:
- Short strikes: Always at-the-money — the strike nearest the current underlying price. ATM options carry maximum extrinsic value and therefore produce maximum premium.
- Wing width: Distance from ATM to each long strike — typically 50–100 points on SPX. Wider wings = more max loss, more credit collected (wings are further OTM and cheaper). Narrower wings = less credit, tighter loss cap.
- Symmetry: Both wings equidistant from ATM for a non-directional structure.
Expiration selection:
- 14–30 DTE: Standard window. Enough premium to justify the structure, enough time to manage if the market moves.
- 7–14 DTE: Higher theta per day, faster resolution.
- 0 DTE: Extreme case — used for same-day expiry plays where pinning is expected. Very high gamma risk.
SPX Example — Entry:
Trade:
| Leg | Strike | Action | Premium |
|---|---|---|---|
| Short call | 5,200 | Sell | +$3,800 |
| Short put | 5,200 | Sell | +$3,200 |
| Long call | 5,300 | Buy | −$1,000 |
| Long put | 5,100 | Buy | −$1,000 |
| Total | +$5,000 |
- Net credit: $50.00 per contract = $5,000 total received
- Max profit: $5,000 (SPX pins exactly at 5,200 at expiry)
- Upper breakeven: 5,200 + 50 = 5,250
- Lower breakeven: 5,200 − 50 = 5,150
- Max loss (either wing): ($100 wing width − $50 credit) × 100 = $5,000
The profit zone peaks at the ATM strike and tapers on both sides. Beyond 5,100 or 5,300, the maximum loss of $5,000 is reached and held flat — the long wings prevent any further loss.
The Payoff Diagram

| SPX at Expiry | P&L |
|---|---|
| 5,050 | −$5,000 (max loss) |
| 5,100 (long put) | −$5,000 (max loss) |
| 5,150 (lower breakeven) | $0 |
| 5,200 (ATM — max profit) | +$5,000 |
| 5,250 (upper breakeven) | $0 |
| 5,300 (long call) | −$5,000 (max loss) |
| 5,350 | −$5,000 (max loss) |
The tent shape (Λ) is the iron butterfly’s signature. Maximum profit occurs only at the ATM pin. The profit zone tapers symmetrically on both sides to the breakevens, then flattens at maximum loss beyond the long strikes.
The Seller vs Buyer Reality
| Iron Butterfly (Seller — this article) | Long Iron Butterfly (Buyer) | |
|---|---|---|
| Probability of Profit | ~55–65% | ~35–45% |
| Max Profit | $5,000 (ATM pin) | $5,000 (move past either wing) |
| Max Loss | $5,000 (move past either wing) | $5,000 (ATM pin) |
| Profit zone | Between the two breakevens | Outside the two breakevens |
| Theta | Ally — earns every day | Enemy — costs every day |
| Vega | Enemy — rising IV hurts | Ally — rising IV helps |
| Ideal condition | Calm, pinning market | Volatile, large move expected |
The iron butterfly seller wins more often — the market tends to stay near ATM more often than it makes a 50-point move within 30 days. But max loss equals max profit, making the risk-reward symmetric at 1:1. Consistent winners must achieve well above 50% win rate, relying on theta as the persistent edge and disciplined stops to prevent any single loss from erasing multiple wins.
Understanding the Greeks
Net Delta (near zero at entry): Selling an ATM call (delta ≈ −0.50) and ATM put (delta ≈ +0.50) produces near-zero net delta at entry. As SPX moves away from 5,200, the position develops delta bias in the direction of movement — the tested short strike gains intrinsic value faster than the untested side decays.
Net Gamma (strongly negative — the primary risk): Short ATM options carry the highest gamma of any strike. Selling both an ATM call and put doubles the negative gamma exposure. A 10-point SPX move near expiration can produce hundreds of dollars of P&L change. Negative gamma accelerates losses as SPX moves away from the strike — losses grow faster than they would on a linear basis. The long wings eventually cap those losses at 5,100 and 5,300, but the 50-point gap between the ATM strike and each wing allows substantial pain before the cap kicks in.
Net Theta (strongly positive — the income engine): ATM options have the highest theta of any strike. Two short ATM options produce the maximum possible theta for a 4-leg defined-risk structure. For a $5,000 credit iron butterfly at 30 DTE, net theta earns approximately $100–$150 per calendar day — significantly more than an iron condor of the same wing width. This is the core appeal: the highest theta available in a defined-risk structure.
Net Vega (strongly negative): Two short ATM options means maximum vega exposure. If VIX rises after entry — even without SPX moving — the mark-to-market loss can be substantial. Entering at VIX 22+ with expected mean-reversion to 15 produces a vega tailwind that amplifies theta income. Entering at VIX 14 and seeing a spike to 22 produces losses before SPX moves at all.
Net Rho (≈ 0): The short call’s positive rho and short put’s negative rho approximately cancel at the same ATM strike. Negligible for 30 DTE structures.
Trade Management
Rule 1 — Profit target: 50% of max credit
If the butterfly collected $5,000 and is now worth $2,500 to close, take it. The final 50% requires holding through the gamma-concentrated zone near expiration — rarely worth the increased risk. Closing at 50% and redeploying is the systematic standard.
Rule 2 — Stop loss: 50–75% of maximum loss
The 200%-of-credit rule used for iron condors does not translate cleanly to the iron butterfly — with max loss equal to max credit, 200% of credit would exceed the maximum possible loss. Instead, close when the mark-to-market loss reaches 50–75% of maximum. On a $5,000 max-loss butterfly, close when the position has lost $2,500–$3,750. A practical trigger: close when SPX breaches either breakeven by more than 15 points and is still moving.
Rule 3 — Time-based close: 10–14 DTE
Close the position with 10–14 days remaining regardless of P&L. The iron butterfly’s gamma risk in the final two weeks is extreme — a single large SPX session can shift the position from full profit to near full loss. Remaining theta income rarely justifies this gamma exposure.
Rule 4 — Rolling to re-centre
When SPX drifts 20–30 points from the short strike, the position develops significant delta bias. Traders sometimes roll: buy back the tested side and re-sell at the new ATM level. Rolling can re-centre delta and collect additional credit — but it extends duration and risk. Roll once at most; never chase a trending market with successive rolls.
Rule 5 — Close before binary events
An iron butterfly is catastrophically exposed to gap moves. If a scheduled FOMC, CPI, or earnings event falls within the remaining days, close before the release. A 50-point gap through the short strike produces a loss approaching maximum, instantly.
Real-World Example
Scenario A — The ideal outcome: post-Fed calm
VIX at 22 reflects pre-Fed anxiety. The Fed meeting is in 2 days; the trader believes it will be a non-event. An iron butterfly is sold at 5,200 for a $5,000 credit.
Day 3 (post-Fed): The Fed held rates as expected. SPX drifted to 5,212. VIX collapsed from 22 to 14.
- Both short options lost value from theta and IV crush simultaneously
- Butterfly now worth approximately $1,700 to close
- Net profit: +$3,300 (66% of max in 3 days)
The vega tailwind from VIX falling 8 points did more work than 3 days of theta alone. This is the iron butterfly seller’s best-case: enter before an event at elevated IV, event resolves quietly, IV collapses, close early for an outsized gain.
Scenario B — The gap failure:
The Fed surprised markets with a hawkish statement. SPX dropped 92 points to 5,108 in a single session — through the lower breakeven of 5,150 and within 8 points of the long put at 5,100.
At SPX 5,108:
- Short put (5,200): worth approximately $92 intrinsic + residual → ~$9,500 to close
- Long put (5,100): worth approximately $2 (8 points OTM, residual time value) → ~$200 offset
- Both call legs: worthless
- Net cost to close: approximately $9,300
- Original credit: $5,000
- Net loss: approximately −$4,300 (86% of maximum)
The 50–75% max-loss stop (triggered at $2,500–$3,750) would have fired as SPX crossed 5,150 and continued falling. By 5,108, the position should already have been closed. If SPX reaches 5,100 or below at expiration: −$5,000 (maximum loss, held flat by the long put wing).
When to Use This Strategy
Best conditions:
- VIX is elevated (20–30) and expected to mean-revert — IV collapse amplifies theta income
- SPX is consolidating with tightening daily ranges and no confirmed trend
- No binary catalyst falls within the expiration window
- Active monitoring is available — the narrow profit zone requires attention
Avoid when:
- VIX is below 15 — credit barely justifies the complexity; breakevens are narrow relative to normal SPX daily range
- SPX is trending — a trending market will push through a breakeven and keep moving
- A known binary event is scheduled within the window
- Position is oversized — one maximum loss requires a full winning trade to recover; size at 1–2% of account equity per butterfly
Compared to Short Straddle: The iron butterfly is strictly safer than a Short Straddle . The wings cap catastrophic loss. The trade-off: credit collected is lower (wings cost premium). Most professional sellers prefer the defined-risk butterfly over the naked straddle specifically because the wings survive events that terminate naked accounts.
Compared to Iron Condor: The iron butterfly collects 2–4× more credit than an Iron Condor of the same wing width — but the condor’s 100-point wide profit plateau gives far more room for SPX to move. The butterfly is the specialist play; the condor is the systematic bread-and-butter trade.
Strategy Ladder — Next Steps
Simplified to: → Short Straddle — remove the wings. Collects more credit, but losses are uncapped. The iron butterfly is the defined-risk version of the short straddle.
Widened to: → Iron Condor — separate the two short strikes to create a wide profit range. Lower credit, much higher probability of keeping it. The iron condor is the systematic seller’s standard.
The buyer-side mirror: → Long Iron Butterfly — buy the same four strikes from the opposite side. Pay a debit, profit if SPX makes a large move past either wing. Same strikes, inverted payoff.
The uncapped seller version: → Short Strangle — sell OTM options on both sides, no ATM exposure, no wings. Wider breakevens, less premium, undefined risk.
This content is for educational purposes only. Options trading involves significant risk of loss. Past performance is not indicative of future results.